Unintentional Princess Leah Buns

Buns 3

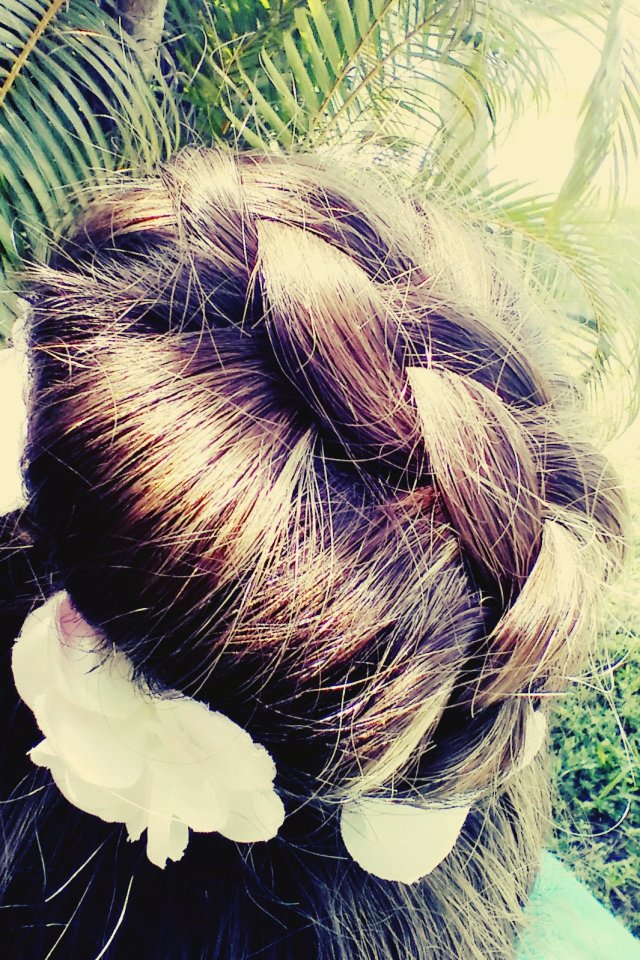
Sometimes when I try a new hairstyle, it doesn’t quite turn out as planned and I have to go in another direction to salvage the look of the day. That’s what happened today. I had wholeheartedly intended to do some milkmaid braids on my glorious head, alas all in vain. I kept trying, and it ended up looking like a messy nest. Since, my hair was not cooperating, I decided to take the two braids I had done and turn the intended look around. Instead of going for an old school milkmaid look, I fast forwarded into the future and chose the Princess Leah buns.

Buns 1

I started by parting my hair right down the middle from the top of my forehead to the nape of my neck. I then braided the sections into simple, three strand braids. I was burned out of braiding once I got around to changing up the hairstyle, so I used a simple braiding technique. A more unique look can be created by using a more intricate braid like a five-strand or fishtail braid. I braided loosely and tugged on the stitches to add a degree of messiness to the hairstyle that Princess Leah’s look lacked.

Buns 2

I proceeded to wrap the braids around themselves so that the buns rested right on top of the upper half of my ear. As I wrapped the braids around themselves, I placed bobby pins sporadically in my hair to hold the bun tight. I would not use a rubber band or ponytail to hold the buns in place for this hairstyle unless you want them to stick out of your head. Moving along, I attempted to tuck in the ends of the braids under the mass of the bun and hold them in place with bobby pins, but I often found it impossible to tame the strays. Say you did it on purpose and call it bohemian.

Princess Leah 2

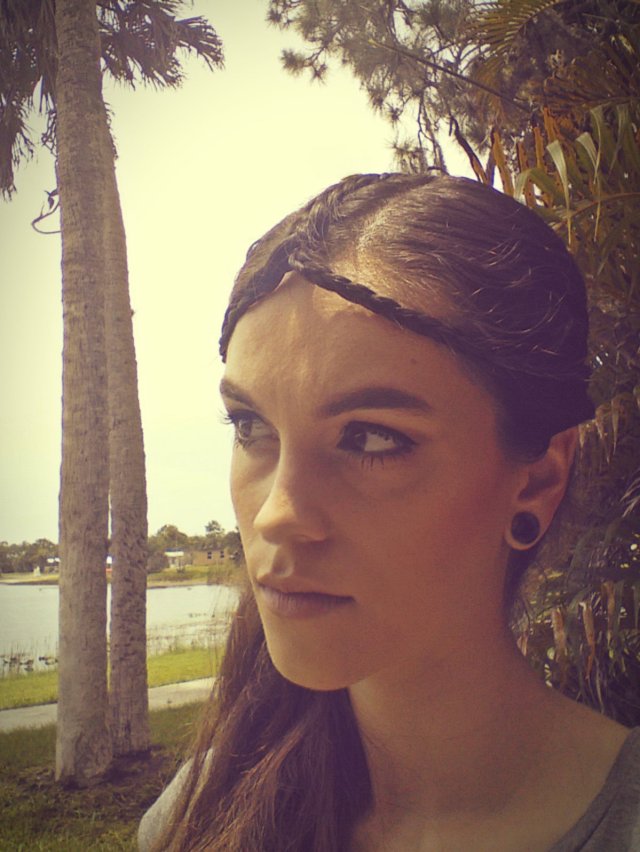
Wonderland wanted to go dark and mysterious for today’s look because it sort of resembled royalty like Princess Leah. I don’t know. Ask the Red Queen. Of course I had to start by applying the Cocoa Powder Foundation in Fair by Too Faced to make my skin look flawless. I then worked some dark tones onto the hollows of my cheeks using the 56 Shadow Blush Palette from Coastal Scents to connect the dark eyes and lips together into one massive black hole.

Princess Leah 1

I primed my eyes using Shadow Insurance in Candlelight by Too Faced. Using the same palette from Coastal Scents, I dusted some deep purples and pinks onto my lids to create a gradient effect. I also accentuated my crease to make it look deeper cut. I decided to use Revlon’s Colorstay Liquid Liner in Blackest Black ever so subtly on my upper lid to make my eyes look larger and lashes look thicker. Speaking of lashes, I used L’Oreal’s Miss Manga Voluminous Black Angel Mascara in Extra Black to really make my eyes pop.

Princess Leah 3

I finished up my look by using Kat Von D’s Studded Kiss Lipstick in Homegirl. This dark lip color really brought out the darkness that seems to have characterized this look. In this picture, you can better see the pointed wing effect I did with my eye shadow on my lids. I created a triangular-like shape on the outer corner of my eyes with a darker shade and brought it into the crease in one full sweep. This seems to have made my eyes look a bit more open. Enjoy the Star Wars comments courtesy of Wonderland. What an odd combination, don’t you think? ♥Alice in Wonderland Beauty♥

Cocoa Powder Foundation

Cocoa Powder Foundation in Fair by Too Faced.

Shadow Insurance Candlelight

Shadow Insurance in Candlelight by Too Faced.

56 Shadow Blush Palette

56 Shadow Blush Palette from Coastal Scents.

Colorstay Liquid Liner

Revlon’s Colorstay Liquid Liner in Blackest Black.

Miss Manga Voluminous Black Angel Mascara

L’Oreal’s Miss Manga Voluminous Black Angel Mascara in Extra Black.

Studded Kiss Lipstick (Homegirl)

Kat Von D’s Studded Kiss Lipstick in Homegirl.

Arabian Eyes

Arabic Eyes 1

Who likes drama? No one. Unless it’s on your eyes. I remember all the crazy makeup I used to wear when I was younger. I was into the the Scene and Emo looks that were characterized mainly by the intense Arabian eyeliner. I took this old makeup style that I used to love and wore so often and made it a bit more mature to match me in my old age. I achieved this by creating a neutral eye shadow look that wasn’t too overbearing with the eyeliner. I also pulled together the intense eye with a deep lipstick that would further darken my look. You may notice that I didn’t take a black kohl pencil to my waterline. I didn’t do this because it tends to make my eye look smaller and with the Arabian eyeliner that is always the opposite of the effect you’re trying to convey. By leaving it blank or filling it with a white kohl liner, it makes your eye look bigger, and bigger is better.

Arabic Eyes 2

I applied the Cocoa Powder Foundation from Too Faced in Fair all over my face and Nectar from Estee Lauder’s Deluxe All-Over Face Compact on the hollows of my cheeks to contour my face. Using only a contour color also expressed the darkness I was trying to convey in this look. I primed my eyes with Shadow Insurance from Too Faced in Candlelight. To create the eye shadow look, I used Estee Lauder’s Deluxe Pure Color EyeShadow Palette. I took the Berry Ice color onto my crease to deepen my eye socket in a color that matched the plum color on my lips. I lined my eye with Revlon’s Colorstay Liquid Liner in Blackest Black and painted my eyelashes with L’Oreal’s Miss Manga Voluminous Black Angel mascara in Extra Black. I pulled the look together with Kat Von D’s Studded Kiss Lipstick in Homegirl.

Hidden Fishtail 2

Having created such an intricate makeup look, I didn’t have much time left over to focus on my hairstyle when I was getting ready or I was just being lazy, so I did something quite simple. I took two sections of my hair right above my ears, brought them together towards the back of my head, and pinned them in place with a cute leopard print bow that I got from Target.

Hidden Fishtail 1

I had just enough time and energy left to jazz up my look by adding a hidden braid an inch behind my left ear. I chose to do a fishtail braid because it looks intricate enough to fool someone into thinking that it took me a long time to do it without actually taking a long time to do. I pulled the braid out of underneath the sea of waves that make up my hair so it could be seen better. ♥Alice in Wonderland Beauty♥

Cocoa Powder Foundation

Cocoa Powder Foundation from Too Faced in Fair.

Deluxe All-Over Face Compact

Estee Lauder’s Deluxe All-Over Face Compact.

Shadow Insurance Candlelight

Shadow Insurance from Too Faced in Candlelight.

Deluxe Pure Color EyeShadow Palette

Estee Lauder’s Deluxe Pure Color EyeShadow Palette.

Colorstay Liquid Liner

Revlon’s Colorstay Liquid Liner in Blackest Black.

Miss Manga Voluminous Black Angel Mascara

L’Oreal’s Miss Manga Voluminous Black Angel mascara in Extra Black.

Studded Kiss Lipstick (Homegirl)

Kat Von D’s Studded Kiss Lipstick in Homegirl.

Puss

Later that evening, the Cheshire Puss came out to play.♠

Dragon Tail / Crescent Split Braid

Dragon Tail, Crescent Split Braid 1

I decided that for today’s look I would channel my inner Wonderland Beauty and try an elaborate braided hairstyle to kick my creative juices into high gear. I didn’t want to do anything too complicated or time consuming, but I still wanted it to look like it was. The first thing I did was delve into the infinite resource of the internet, getting creative ideas from bloggers and gurus from around the world with step-by-step tutorials to boot. I know what I am capable of doing in terms of my skill level and hair type/length, so I narrowed my search based on that.

Dragon Tail, Crescent Split Braid 2

I found an amazing and easy ‘fake’ braid that required little to no effort which was just what I needed! I started by pulling my hair into a high ponytail. Here you can take a small section of hair to wrap around the ponytail your using for a more chic look and then just pin it in place with a bobby pin. After that, I split my hair into two sections: one on the top and one on the bottom. I created two little three strand braids in both sections towards the middle of my ponytail before beginning the actual ‘braiding’ part. You can use any type of little braids you like for this look, but I was trying to do something quick and easy.

Dragon Tail, Crescent Split Braid 3

Next, I split the top section into two making sure that one little braid went with each section I made, pulled them under my bottom section, and tied them with a small black rubber band. I split the new top section which was originally the bottom section into two sections with a little braid in each and pulled it under the bottom section (originally the top section) before pulling them together with a black rubber band. I got this idea from Lilith Moon, a YouTuber with great ideas for hairstyles. If these instructions were too hard to follow, then click here for the video explanation.

Fire Truck Red 3

I was craving the classic red lipstick today, so I decided to do a Red Queen look. I primed my eyes with Shadow Insurance in Candlelight from Too Faced. I used the red, silver, and black shadows from my 56 Shadow Blush Palette from Coastal Scents on my eyes pulling the crease color very close to the inner eyebrow corner. I also brought the colors down onto my lower lid to open up my eyes. I carefully painted my eyelashes with L’Oreal’s Miss Manga Voluminous Black Angel mascara in Extra Black to pull the eye look together and open up my eyes further.

Fire Truck Red 2

I covered my face with the Cocoa Powder Foundation from Too Faced in Fair and used the Liquified Long Wear Lipstick from Too Faced in Melted Velvet to pull together the classic red lipstick look I so desired. I also used a deep blush with a red undertone from the 56 Shadow Blush Palette from Coastal Scents to pull this Red Queen look off. You can never have too much of a good thing, so I went full throttle with all the red in this look.

Fire Truck Red 1

Bringing the red eye shadow deep into my crease and over to the inner corner of my eyebrows gave me a sweet, sad look without pulling my eyebrows together in the middle. I like the cute expression it gave me without taking away from the intensity of the red and slightly smokey eye shadow I created as well. It’s a new technique I tried out that may or may not work for different eye shapes and sizes. Have fun trying new things and don’t be afraid to experiment with your beauty routine. ♥Alice in Wonderland Beauty♥

Cocoa Powder Foundation

Cocoa Powder Foundation from Too Faced in Fair.

Shadow Insurance Candlelight

Shadow Insurance in Candlelight from Too Faced.

56 Shadow Blush Palette

56 Shadow Blush Palette from Coastal Scents.

Miss Manga Voluminous Black Angel Mascara

L’Oreal’s Miss Manga Voluminous Black Angel mascara in Extra Black.

Melted Velvet

Liquified Long Wear Lipstick from Too Faced in Melted Velvet.

Waterfall French Braid

Cotton Candy 1

I was inspired by cotton candy for this look. I like the soft fluffiness of the texture and and the sweet, delicate colors, so I made an edible look. Contrary to my usual deep, hollowed cheeks, I used a gentle pink blush Petal from Estee Lauder’s Deluxe All-Over Face Compact to match the eye shadow from the 56 Shadow Blush Palette by Coastal Scents. I also donned Mac’s Viva Glam lipstick in Gaga (Lustre) to make me look more youthful and fresh. Some may say this is too much pink, but I say you can never have too much of one thing!

Cotton Candy 2

I felt the spider leg lashes created by L’Oreal’s Miss Manga Voluminous Black Angel mascara in Extra Black and thick Revlon Colorstay Liquid Liner in Blackest Black were a fun contrast to the softness of the look that added a tinge of the darknessI love to incorporate into my looks. I barely creased my eye with a powdery purple color that I think went well with the pink from the same palette. I gave myself the soft, airbrushed look with the Cocoa Powder Foundation from Too Faced in Fair.

Waterfall Braid 2

The real star was my hair in this look. The waterfall braiding craze flew way over my head and was gone before I could even figure out how to do it. I thought I would bring it back in a whole new way by combining the waterfall braid with a braid that I know very well: the french braid. I divided a section at the top of my head that started and ended parallel to the highest points of my eyebrows to elongate my face.

Waterfall French Braid 1

I then started to french braid that section. After each stitch, I would drop the section that was the next to be incorporated into the braid and replace it with a new section from the hair I was braiding at the top of my head. I did this enough times that I dropped three sections from the braid on either side to create the waterfall braid look. You can later tug at these waterfall strands throughout the day as the look loosens up to tighten everything back into place.

Waterfall Braid 3

After I got to the end of my french braid, I braided normally until I was halfway down the section of hair I had left. I then tied my hair together into a black rubber band. I let the rest of my hair lie loose beneath my concoction. The loose hair can be curly, straight, or wavy. I would suggest letting the rest of the hair loose so that the waterfall strands are noticeable or creating two adjacent waterfall braids on either side of the head that incorporate the waterfall strands from the french braid into them. ♥Alice in Wonderland Beauty♥

Cocoa Powder Foundation

Cocoa Powder Foundation from Too Faced in Fair.

Shadow Insurance Candlelight

Shadow Insurance in Candlelight from Too Faced.

Miss Manga Voluminous Black Angel Mascara

L’Oreal’s Miss Manga Voluminous Black Angel mascara in Extra Black.

Colorstay Liquid Liner

Revlon’s Colorstay Liquid Liner in Blackest Black.

56 Shadow Blush Palette

56 Shadow Blush Palette by Coastal Scents.

Deluxe All-Over Face Compact

Estee Lauder’s Deluxe All-Over Face Compact.

Viva Glam Gaga Lustre

Mac’s Viva Glam lipstick in Gaga (Lustre).

Double Winged Liner on Upper and Lower Lid

Double Wing 3

I have recently been using winged liquid eyeliner as my go-to look when I have been running late or have been too tired to do anything more detailed. I felt like I was starting to do the same look too often for my taste, and I decided that I needed a bit of Wonderland’s magic to spice up my eye makeup routine. I looked up some videos, blog posts, and images of various styles of winged eye liner to help me. Whenever you feel like you need inspiration, I encourage you to delve into the extensive beauty community online because you will never be disappointed with what you find.

Double Wing 2

I decided I’d try the double winged liner on both the upper and lower lid paired with an odd lilac color on my lips to create a sort of futuristic look. I ended up loving it a lot. I created a light eye shadow look with soft colors and barely any shading on the crease so that the eyeliner would be the main focus of the eyes. This look would go great with any combination of colors, though. Bright colors would contrast well with the dark liner.

Double Wing 1

Having the liner on both the lower and upper lids pulls the eyes open and makes them look slightly larger which is great because when I’m not wearing eye makeup my eyes look like they’re the size of peas. I also made sure to lengthen my lashes by applying two layers of mascara, separating each lash with the point of my tweezers, and coating the front and back sides of my lashes. The long lashes accentuate the winged tips making them look like an extension of the natural lash line which elongates the eyes.

Six Braids 1

To continue with the sleek, elongated look of the double winged liner, I pulled my hair back into a ponytail. I’m sure you know by now that I couldn’t just leave it at that, so I added several braids to the top of my head to create a more unique look and, of course, to prevent stray hairs from flying away. I completed the look by tying a flowery pink ponytail in my hair that I got from PacSun.

Six Braids 3

I varied the braids that I used in my hair to give it a fun look. I made five sections at the very front of my hairline and did a dutch braid at the top, two regular three strand braids on either side, and two fishtail braids right above the ears. I then made two sections in between the dutch braid and the regular three strands braids and braided two more regular three strand braids. This hairstyle was very time consuming because it was so elaborate, but you can change up the types of braids you use to make it more unique or easier depending on your skill and available time.

Six Braids 2

On my face, I used the Cocoa Powder Foundation in Fair by Too Faced and Nectar from Estee Lauder’s Deluxe All-Over Face Compact on the hollows of my cheeks as a contour. I primed my eyes with Shadow Insurance in Candlelight from Too Faced and then created the double winged liner with Revlon’s Colorstay Liquid Liner in Blackest Black. I made the soft look on my eyes with Estee Lauder’s Deluxe Pure Color EyeShadow Palette by applying Ivory Box to my brow bone and inner eye corner, Silver Ball all over my lid, and Mocha Cup to my crease. The mascara I used was L’Oreal’s Miss Manga Voluminous Black Angel in Extra Black. I pulled the look together with Kat Von D’s Studded Kiss Lipstick in Coven.

Cocoa Powder Foundation

Cocoa Powder Foundation in Fair by Too Faced.

Deluxe All-Over Face Compact

Estee Lauder’s Deluxe All-Over Face Compact.

Shadow Insurance Candlelight

Shadow Insurance in Candlelight from Too Faced.

Deluxe Pure Color EyeShadow Palette

Estee Lauder’s Deluxe Pure Color EyeShadow Palette.

Colorstay Liquid Liner

Revlon’s Colorstay Liquid Liner in Blackest Black.

Miss Manga Voluminous Black Angel Mascara

L’Oreal’s Miss Manga Voluminous Black Angel in Extra Black.

Studded Kiss Lipstick (Coven)

Kat Von D’s Studded Kiss Lipstick in Coven.

French Braid Ponytail

French Braid Ponytail 2

Sometimes the hair that grows right at my hairline, above my forehead, sticks out of my ponytail and looks absolutely ridiculous. It never seems to grow any longer, year after year. To remedy this slight problem, I decided to add a lovely french braid only at the top of my head to hold these stray hairs tightly before pulling my remaining hair into a ponytail.

French Braid Ponytail 4

I created a wide section at the top of my head that began and ended parallel to the highest points of my eyebrows so that the hairstyle would pull my face shape up. I then french braided my hair through that section until I was about an inch above my ears or a little past the top of my head because that is where I wanted my ponytail to sit. I then scooped up the rest of my hair into my hand and brushed the sides of my head to smooth the stray hairs that plague my head before I tied my hair up into my ponytail.

French Braid Ponytail 1

I touched up the sides of my head with some hairspray to keep the strays at bay and pulled the look together with a cute flowered ponytail that I bought at PacSun. The ponytail is lined with soft pink flowers all along the length of it. I doubled the ponytail over itself to create a tighter hold on my hair and arranged the flowers so that they were all visible. I believe it added a sweet touch to my look that balanced with the dark makeup I sported but that could just be some nonsense the Cheshire Puss whispered into my ear to disorient me. I think it is cute and lovely, and that’s why I wore it.

Dark Makeup 2

All in all, the look pulled together and produced an interesting mix of cute, chic, and creative which is what Wonderland is there for: to facilitate our creativity and uniqueness to build our confidence in ourselves as beautiful flowers.

Dark Makeup 3

After several days of neutral makeup tones, hues, and shades, I decided to switch it up quite a bit in the opposite direction because in Wonderland everything is as it ought not be and what is simply isn’t. In any case, I decided to use dark shadows and lipstick to get in touch with my edgier roots since goth makeup is how I got into the beauty and makeup area of Wonderland anyway.

Dark Makeup 1

To create this look, I used the darker grey and brown shades of eye shadow from Coastal Scents’ 56 Shadow Blush Palette. I also used a deep blush tone from the same palette. I primed my eyes with Shadow Insurance in Candlelight from Too Faced. I lined my eyes with Revlon’s Colorstay Liquid Liner in Blackest Black and applied L’Oreal’s Miss Manga Voluminous Black Angel mascara in Extra Black onto my eyelashes. On my face, I applied Covergirl’s Aquasmooth foundation in Classic Ivory. I painted my lips with Kat Von D’s Studded Kiss Lipstick in Homegirl. ♥Alice in Wonderland Beauty♥

Aquasmooth Foundation

Covergirl’s Aquasmooth foundation in Classic Ivory.

Shadow Insurance Candlelight

Shadow Insurance in Candlelight from Too Faced.

56 Shadow Blush Palette

Coastal Scents’ 56 Shadow Blush Palette.

Colorstay Liquid Liner

Revlon’s Colorstay Liquid Liner in Blackest Black.

Miss Manga Voluminous Black Angel Mascara

L’Oreal’s Miss Manga Voluminous Black Angel mascara in Extra Black.

Studded Kiss Lipstick (Homegirl)

Kat Von D’s Studded Kiss Lipstick in Homegirl.

French Braid Doughnut Bun

French Braid Bun 4

The look I created today is a simple way to modify an old favorite: the doughnut (or sock) bun. I enjoy braids and decided that I’d add one over the large bun that is created using the doughnut method. What I am referring to when I say the doughnut (or sock) method is using a hair accessory that looks like a doughnut, such as an old sock that has had the toe section cut off and then rolled over itself, to create a bun.

French Braid Bun 2

To create the large bun, you take the hair accessory and loop it through the hair that falls from a ponytail. You then tilt your head forward, spread the hair over the doughnut, and finally secure the hair with another ponytail. When you do this, there is usually a lot of hair left out of the bun. I commonly used this method when I was a child to create a large bun on my head even if my hair was too thin or too short to create such a thick bun, and I just left the hair that hung out of the sock lying on either side of it. Now that I am bit more mature and have learned a thing or two about hairstyling, I decided to bring Wonderland into my old routine to create a more unique look.

French Braid Bun 3

I put my hair into a bun using the doughnut (or sock) method that I described above and then I used the remaining hair that usually hung on either side to create a braid over my bun. I achieved this by keeping my head tilted forward so that my hair would remain spread out after I had secured my bun. I took a small section of hair at the top of my head and began a three strand braid. I braided one stitch regularly and then began adding pieces of the remaining hair to the sections of braid as I would with a french braid. I continued to french braid my hair over the bun until I got to the bottom of the bun. I then tucked the remaining hair under the bun and used a few bobby pins to hold the stray strands in place and secure the bun further.

French Braid Bun 1

To create an even sweeter, tea time look, I added a floral ponytail that I purchased from PacSun. It’s a black ponytail with several soft pink flowers all around it. Besides making the look more doll-like than before, it also hides the bobby pins and stray hairs while adding another level of security to your hairstyle that will be sure to hold your bun in place while you celebrate the Frabjous day by doing the Futterwacken.

Monotone Moan 1

For my makeup, I went for a darker, neutral look. I could sit here and say that I chose a more monotone palette because a more colorful or edgier look would have taken away from the bun, but I would lying. I could not be bothered with my makeup today, so I went with a simple and soft smokey eye with a fair nude lipstick color to match. The allure of Wonderland is that there are no boundaries, so we can create whatever we desire without having to explain ourselves and just enjoy our beauty and creativity.

Monotone Moan 2

I used Covergirl’s Aquasmooth foundation in Classic Ivory on my face. For the hollows of my cheeks, I mixed Nectar and Pink Kiss from Estee Lauder’s Deluxe All-Over Face Compact to create a contoured shape with some deep color. On my lips, I applied Buxom’s Full-On Lipstick in Marrakech. I primed my eyes with Shadow Insurance in Candlelight by Too Faced and then used the colors Silver Ball, Mocha Cup, and Espresso Cup from Estee Lauder’s Deluxe Pure Color EyeShadow Palette to give myself a soft smokey eyeshadow. I also highlighted my eyes with Ivory Box and Lemon Square from that same palette. I finished off my eyes with Miss Manga Voluminous Black Angel Mascara by L’Oreal in Extra Black. ♥Alice in Wonderland Beauty♥

Aquasmooth Foundation

Covergirl’s Aquasmooth foundation in Classic Ivory.

Deluxe All-Over Face Compact

Estee Lauder’s Deluxe All-Over Face Compact.

Deluxe Pure Color EyeShadow Palette

Estee Lauder’s Deluxe Pure Color EyeShadow Palette.

Shadow Insurance Candlelight

Shadow Insurance in Candlelight by Too Faced.

Miss Manga Voluminous Black Angel Mascara

Miss Manga Voluminous Black Angel Mascara by L’Oreal in Extra Black.

Full-On Lipstick

Buxom’s Full-On Lipstick in Marrakech.

Braid Tiara

Braid Tiara 1

The braid tiara look was inspired by Kate Bosworth’s look at Coachella 2015 styled by Bridget Brager. Adding a bit of Wonderland to the hairstyle, I decided to do away with the half-up knot and let all the hair that wasn’t braided tumble down my back and over my shoulders. I also took the remaining hair that was leftover when the cornrow was done and made two separate, smaller braids to create the braided tiara effect. In order to have thicker braids as the base of tiara, I also increased the width of the cornrow. This allowed for more hair to be leftover for the two smaller braids that would frame my face.

Braid Tiara 2

To create the braid tiara look, you start by forming the section in the center of your head. You can make the section wider for a thick tiara or narrower for a barely-there pop of braid in your hair. The braid should begin on the top of your head right before the area where your head starts to curve. The braid I did was a cornrow, but you can add some of Wonderland’s magic to your hairstyle and try it out with a french braid, fishtail braid, rope braid, box braid, waterfall braid, lace braid, four strand braid, knot braid, or a braid of your own creation.

Braid Tiara 3

To do the cornrow, you begin by taking a small piece towards the back of your head and braiding one full stitch with the side strands consecutively going under the middle strand (as in a dutch braid). You incorporate pieces of the sectioned off hair to the side strands as you bring them underneath your middle strand so that the braid lays flat on your head. Once you have braided up to your forehead, you split the braid into two sections with one side containing two of the strands and the other side containing one. If you want your hair to look like Kate Bosworth’s, you would stop here and incorporate the two new sections into a half-up messy bun. I decided to split each section of my remaining hair into three new strands and continue to dutch braid the remaining hair. I then tied the two braids together towards the back of my head with a small, black rubber band, but you can also use bobby pins or a decorative clip to hold them in place.

Braid Tiara 4

For my makeup, I created a soft smokey eye with neutral browns and golds using the 56 Shadow Blush Palette from Coastal Scents. With the same palette, I only added a caramel colored blush as a bronzer to the hollows of my cheeks without applying any pink or red blush to the apples of my cheeks. I also drew a short winged line on my eyelid with Revlon’s Colorstay Liquid Liner in Blackest Black and applied L’Oreal’s Miss Manga Voluminous Black Angel mascara in Extra Black. I primed my eyes with Shadow Insurance from Too Faced in Candlelight and applied Covergirl’s Aquasmooth foundation in Classic Ivory all over my face and neck. I decided to continue the monotone color scheme on my lips by using Buxom’s Full-On Lipstick in Marrakech. ♥Alice in Wonderland Beauty♥

Kate Bosworth

Kate Bosworth’s hair styled by Bridget Brager.

Aquasmooth Foundation

Covergirl’s Aquasmooth foundation in Classic Ivory.

Shadow Insurance Candlelight

Shadow Insurance from Too Faced in Candlelight.

56 Shadow Blush Palette

56 Shadow Blush Palette from Coastal Scents.

Colorstay Liquid Liner

Revlon’s Colorstay Liquid Liner in Blackest Black.

Miss Manga Voluminous Black Angel MascaraL’Oreal’s Miss Manga Voluminous Black Angel mascara in Extra Black.